
ROBOTS’ LAB PARTY [PREPARATION]
Choosing the right model of robot took quite a while: it had to be simple, yet funny, doable in a couple of hours, by 7 years old kids. Plus, no dangerous tools involved or hazardous manipulations required. Eventually we draw inspiration from this projet below with some variations.
The main problem for us was to eliminate soldering from the process (a step that is not shown on the video but is obviously necessary to connect the cables onto the electric motor). We decided to do this in advance so the kids would have in hand the motor with the cables already attached to it. We also wanted to avoid gluing the battery onto the board (the robot dies with the battery otherwise) so we thought of introducing a battery case to allow their replacement.
Last but not least, the video does not specify the type of motor to use: so the challenge was to find the right balance between the battery voltage and the power of the electric motor. The problem is that you need to generate enough electric power for the robot to lift its own weight while it moves: it turns out that a 9V battery is too powerful for a 3V DC motor (we got burning smell out of it: not the kind of thing you want kids to go back home with!). But if you choose a bigger motor, then the robot gets heavier and guess what? You need to increase the power of the battery… When you do that, not only the risk of burning the circuit remains unchanged, but also you generate so much power that when you turn on the robot you’ll see it run at a disproportionate speed and crash against the first wall… (we tried that too!)
After some headache, we eventually came to the conclusion that we needed to keep the robot as light as possible, so it could move with little electric power. The safer way to go was to get the weight of batteries out of it, by having the battery case and power switch in hand. After a couple of failed trials, we got to the prototype we liked: the result was a sort of funny robot on a leash… see below:
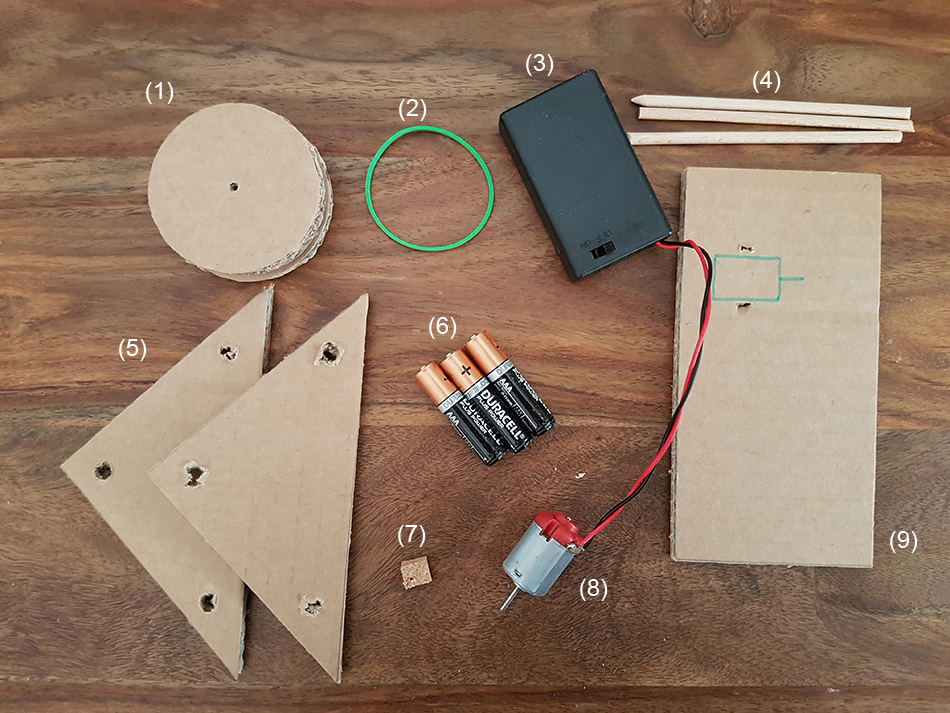
At this point we prepared individual building kits (one for each child), each box containing:
(1) a cardboard pulley wheel (7 cm external diameter; 7cm internal diameter); we covered the internal wheel with isolation tape, to ensure sufficient friction to the rubber band) punctured at the center (1)
(2) a rubberband
(3) a battery case with a switch
(4) 3 wooden sticks
(5) 2 triangular cardboards (base: 7 cm; high: 14 cm) punctured at the angles
(6) 3 batteries AAA
(7) 1 cork dice 4×4 mm
(8) a DC motor 3V soldered to the battery case cables
(9) 1 rectangular card board (14 x 8 cm) with the shape of the motor drawn on it and 2 tiny slits
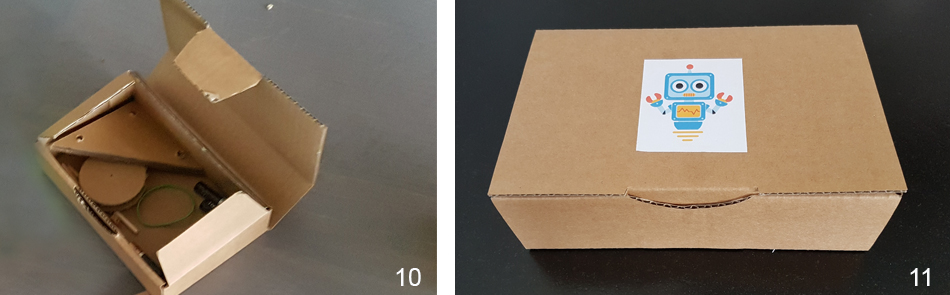
Once we got the above elements ready, we put them in a box (10): one box for each invitee. We decorated the box with a printout of the funny robot we choose as mascotte and logo for the whole party (11).
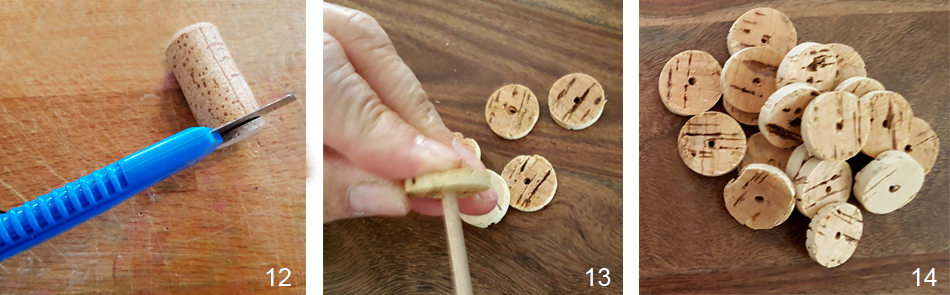
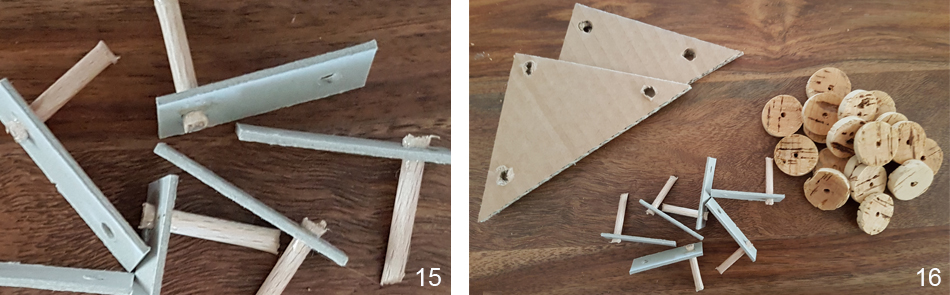
One last thing we had to prepare was the second individual kit composed of:
- 18 discs made out of cork (12) with a hole in the middle (13-14)
- 8 small arms made of cardboard and wooden stick (15)
- 2 triangular cardboards (base: 7 cm; high: 14 cm) punctured at the angles (16)
Once we got these last pieces ready, we put them in a plastic bag: one bag for each invitee.